IP Matrix Switcher setup, remote Pro-AV management, BeingHD IP matrix
-
Product Overview
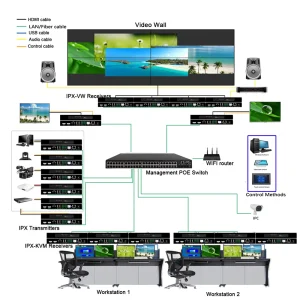
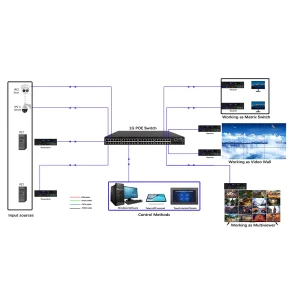
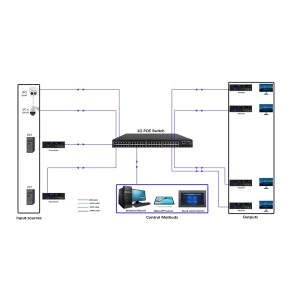
- Function: Route AV signals over IP networks (Ethernet/Wi-Fi) for multi-site, large-scale Pro-AV systems
- Advantages: Scalable (up to 128×128 ports), remote management, no distance limits (with internet)
- Target Users: AV integrators, enterprise IT teams, stadium/venue managers
-
Technical Specifications
- Video: 4K@60Hz (4:4:4), HDR10, 10-bit color
- Audio: 7.1 声道,Dolby TrueHD, DTS:X
- Network: Gigabit Ethernet, IPv4/IPv6, QoS support
- Management: Web UI, REST API, SNMP, third-party control system integration (Crestron, Control4)
- Operating System: Embedded Linux (stable, low maintenance)
-
Network Setup Requirements
- Hardware: Managed Gigabit Ethernet switch (Layer 2/Layer 3), Cat6 cables, PoE support (optional)
- Network Configuration: Static IP addresses for matrix switcher and endpoints; VLAN configuration recommended to isolate AV traffic.
- Bandwidth: 1Gbps per stream (4K@60Hz); reserve 20% extra bandwidth for stability.
-
Remote Management Steps
Step 1: Connect the IP Matrix Switcher to your network (Ethernet port); assign a static IP.
Step 2: Access the Web UI via browser (enter switcher IP; default login provided in manual).
Step 3: Configure input/output endpoints (add transmitters/receivers, assign names/locations).
Step 4: Set up routing rules (e.g., “Source 1 → Display 1-5”, “Source 2 → Remote Site A”).
Step 5: Enable remote monitoring (view signal status, bandwidth usage, error logs) and firmware updates.
-
Security & Reliability
- Password protection for Web UI/API access.
- Redundant power supply (optional) to prevent downtime.
- Automatic failover: If one network path fails, signals reroute to backup path.
Downloadable Resource:Link to Web UI user guide, API documentation, and network security best practices.